
Jenkins Pipeline
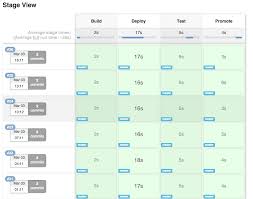
19 Apr 2017Ahh the jenkins pipeline. The cure for all evils. They entice you in with images like the below, but getting a pipeline up and running involves a lot of soul searching and googling sometimes even venturing into the dark place known as the second page of google results:
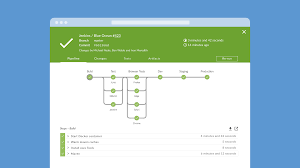
After trying and failing to get a sophisticated build pipeline up and running, I attacked something simpler, a continuous delivery pipeline which involved cleaning up, deploying to and restarting my Tomcat container.
The first step was to allow the user to select a server from a yaml configuration and then populate the environment with appropriate values. Simple enough, yea you would think so. Since there is apparently no other script section in a pipeline job but the pipeline DSL, I had to write code to populate the build environment which there weren’t any clear instructions for. To begin with I wanted to write some groovy code to parse my yaml:
import org.yaml.snakeyaml.Yaml
import hudson.model.*


serverParam = "${env.SERVER}"

node
{
    stage("Populating Environment")
    {

        Yaml parser = new Yaml()
        servers=parser.load(("C:/users/jenkinsldap/servers.yml" as File).text)
        println servers
        for(server in servers)
        {

                if(server.server.name == serverParam)
                {
                                tomcathome = server.server.tomcathome
                                println tomcathome
                                username = server.server.user
                                println username

                                break;
                }
        }

}
I initially put the imports inside the node, but that’s a big no-no. Once I had this code working, I figured I can use the variables in my subsequent stages, but again I was stumped at the inability to do so. I tried some solutions to store the variables in the environment, none of which were quite satisfactory:
- Export to a file
- Include other stages within the scope of the node.
- Use withEnv, but everything needing the env variables has to be defined within the enclosing block.
Then after extensive googling, I came up with the below snippet to populate the environment:
@NonCPS
def populateEnv(){ binding.variables.each{k,v -> env."$k" = "$v"} }- Methods have to be defined outside of a node or stage
The above method when called will push all variables defined into the build environment:
 TOMCAT_REMOTE=tomcathome.replace(":","\$")
 populateEnv()
 bat 'del /F /Q "\\\\%serverParam%\\%TOMCAT_REMOTE%\\webapps\\test.war"'
My next challenge was to use credentials stored in Jenkins so I did not have to store passwords in plain text. The common suggestions provided are the EnvInject plugin or the Credentials Binding plugin, but the pipeline does not provide any ability to use these. Again after venturing into the dark corners of Google, I came up with the below:
withCredentials([[$class: 'UsernamePasswordMultiBinding', credentialsId: 'ef4e1f38-7061-4acf-91e3-d041e0d28638',
                    usernameVariable: 'USERNAME', passwordVariable: 'PASSWORD']])
{
}
Anything within the scope of the above will have access to the credential indicated by the id. While this is a pretty elegant solution, it is a little too powerful for it’s own good. If the username is ‘testuser’ it will replace any occurance of testuser with the password even when testuser needs to be used in a string while defining paths.
Another issue I faced was invoking batch commands through groovy, which was not a big challenge and was easily solved by doing this:
def command = "C:\\Windows\\SysWOW64\\psexec -s  \\\\"+serverParam+" -u "+USERNAME+" -p "+ PASSWORD+" -h cmd /c \"sc stop Tomcat8\""
    println command.execute().text
And that was it, I was able to run a continuous delivery pipeline depicted beautifully as above. I still have some clunkiness and challenges that I am working on:
- Better way to handle credentials which works as smoothly as injecting passwords using the EnvInject plugin.
- For some reason the bat command ‘sc query Tomcat’ doesn’t seem to work when called from the pipeline.
- The pipeline script from scm runs in a Groovy sandbox which is very restrictive and does not allow many Groovy libraries. So currently the build has the script which is painful to synchronize with Git and any change to it needs script approval.


